Disclaimer: Information in this Basic Guide is intended to provide general information on a particular subject and is not an exhaustive treatment of such subject. Renegade Motorsports makes no representations, implied or otherwise, that the content available in this Basic Guide is free from errors or omissions. Users are encouraged to consult professional advice before taking any course of action related to information, ideas, or opinions expressed in this Basic Guide. All performance modifications and installations are performed at the customer's own risk.
Renegade Motorsports S2000 Boot Delete:
(1) Carbon fiber S2000 boot delete bezel
Tools/Supplies Required:
- Epoxy (or similar)
- Phillips screw driver
Difficulty: 4/10
Completion Time: ~1 hour
TIP: The biggest challenge is that the OEM shroud has a slight convex curve to it, whereas the carbon bezel is flat. We have designed the bezel to the correct thickness allowing for some flexibility while remaining rigid.
AP2 - firmly push past the small plastic nubs to seat the bezel flush. It is essential to tack/epoxy corners one edge at a time to ensure flush/proper fitment (picture for reference in future steps below); the narrow edge of the OEM bezel makes tolerances very tight. Patience and taking the proper time ensures a clean install, otherwise gaps and fit/finish will be compromised.
When using epoxy (or similar), ensure that the application layer is thin, otherwise the OEM bezel will not reinstall flush to the console.
*Reference our short shift kit install guide on how to remove the OEM console if necessary.
1. Place the carbon bezel into position. (AP2 guys, the orientation is opposite of pictured). While holding in place, flip the whole bezel over to the opposite top side to identify the position/placement that ensures there are no gaps.

2. The corners and edges should sit tight/flush as pictured here. If you see gaps, reposition the bezel until the optimum placement is found.

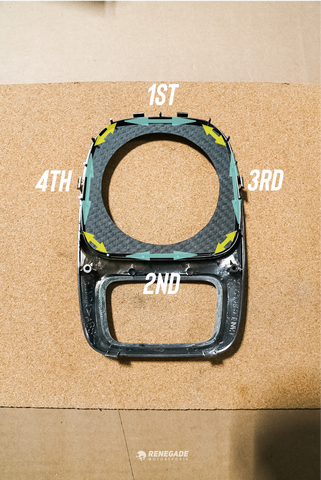
3. The yellow arrows identify where to epoxy. The numbered areas identify the order in which it should be secured. Once you have epoxied one area, ensure that it fully dries/cures before moving to the next. Holding the bezel in place while this occurs is necessary.

4. Once the four corners have been secured, the teal arrows identifies where to epoxy next. Follow the numbers to identify the order, repeating the step above.
5. Epoxy curing times vary. Ensure the proper time has elapsed before reinstalling the bezel back to the OEM console.

6. Your final product should look like this. Reinstall your OEM console back in reverse order.

We hope you found this installation guide helpful. Thanks for your interest and support in our company; we appreciate your business!
Leave a comment